
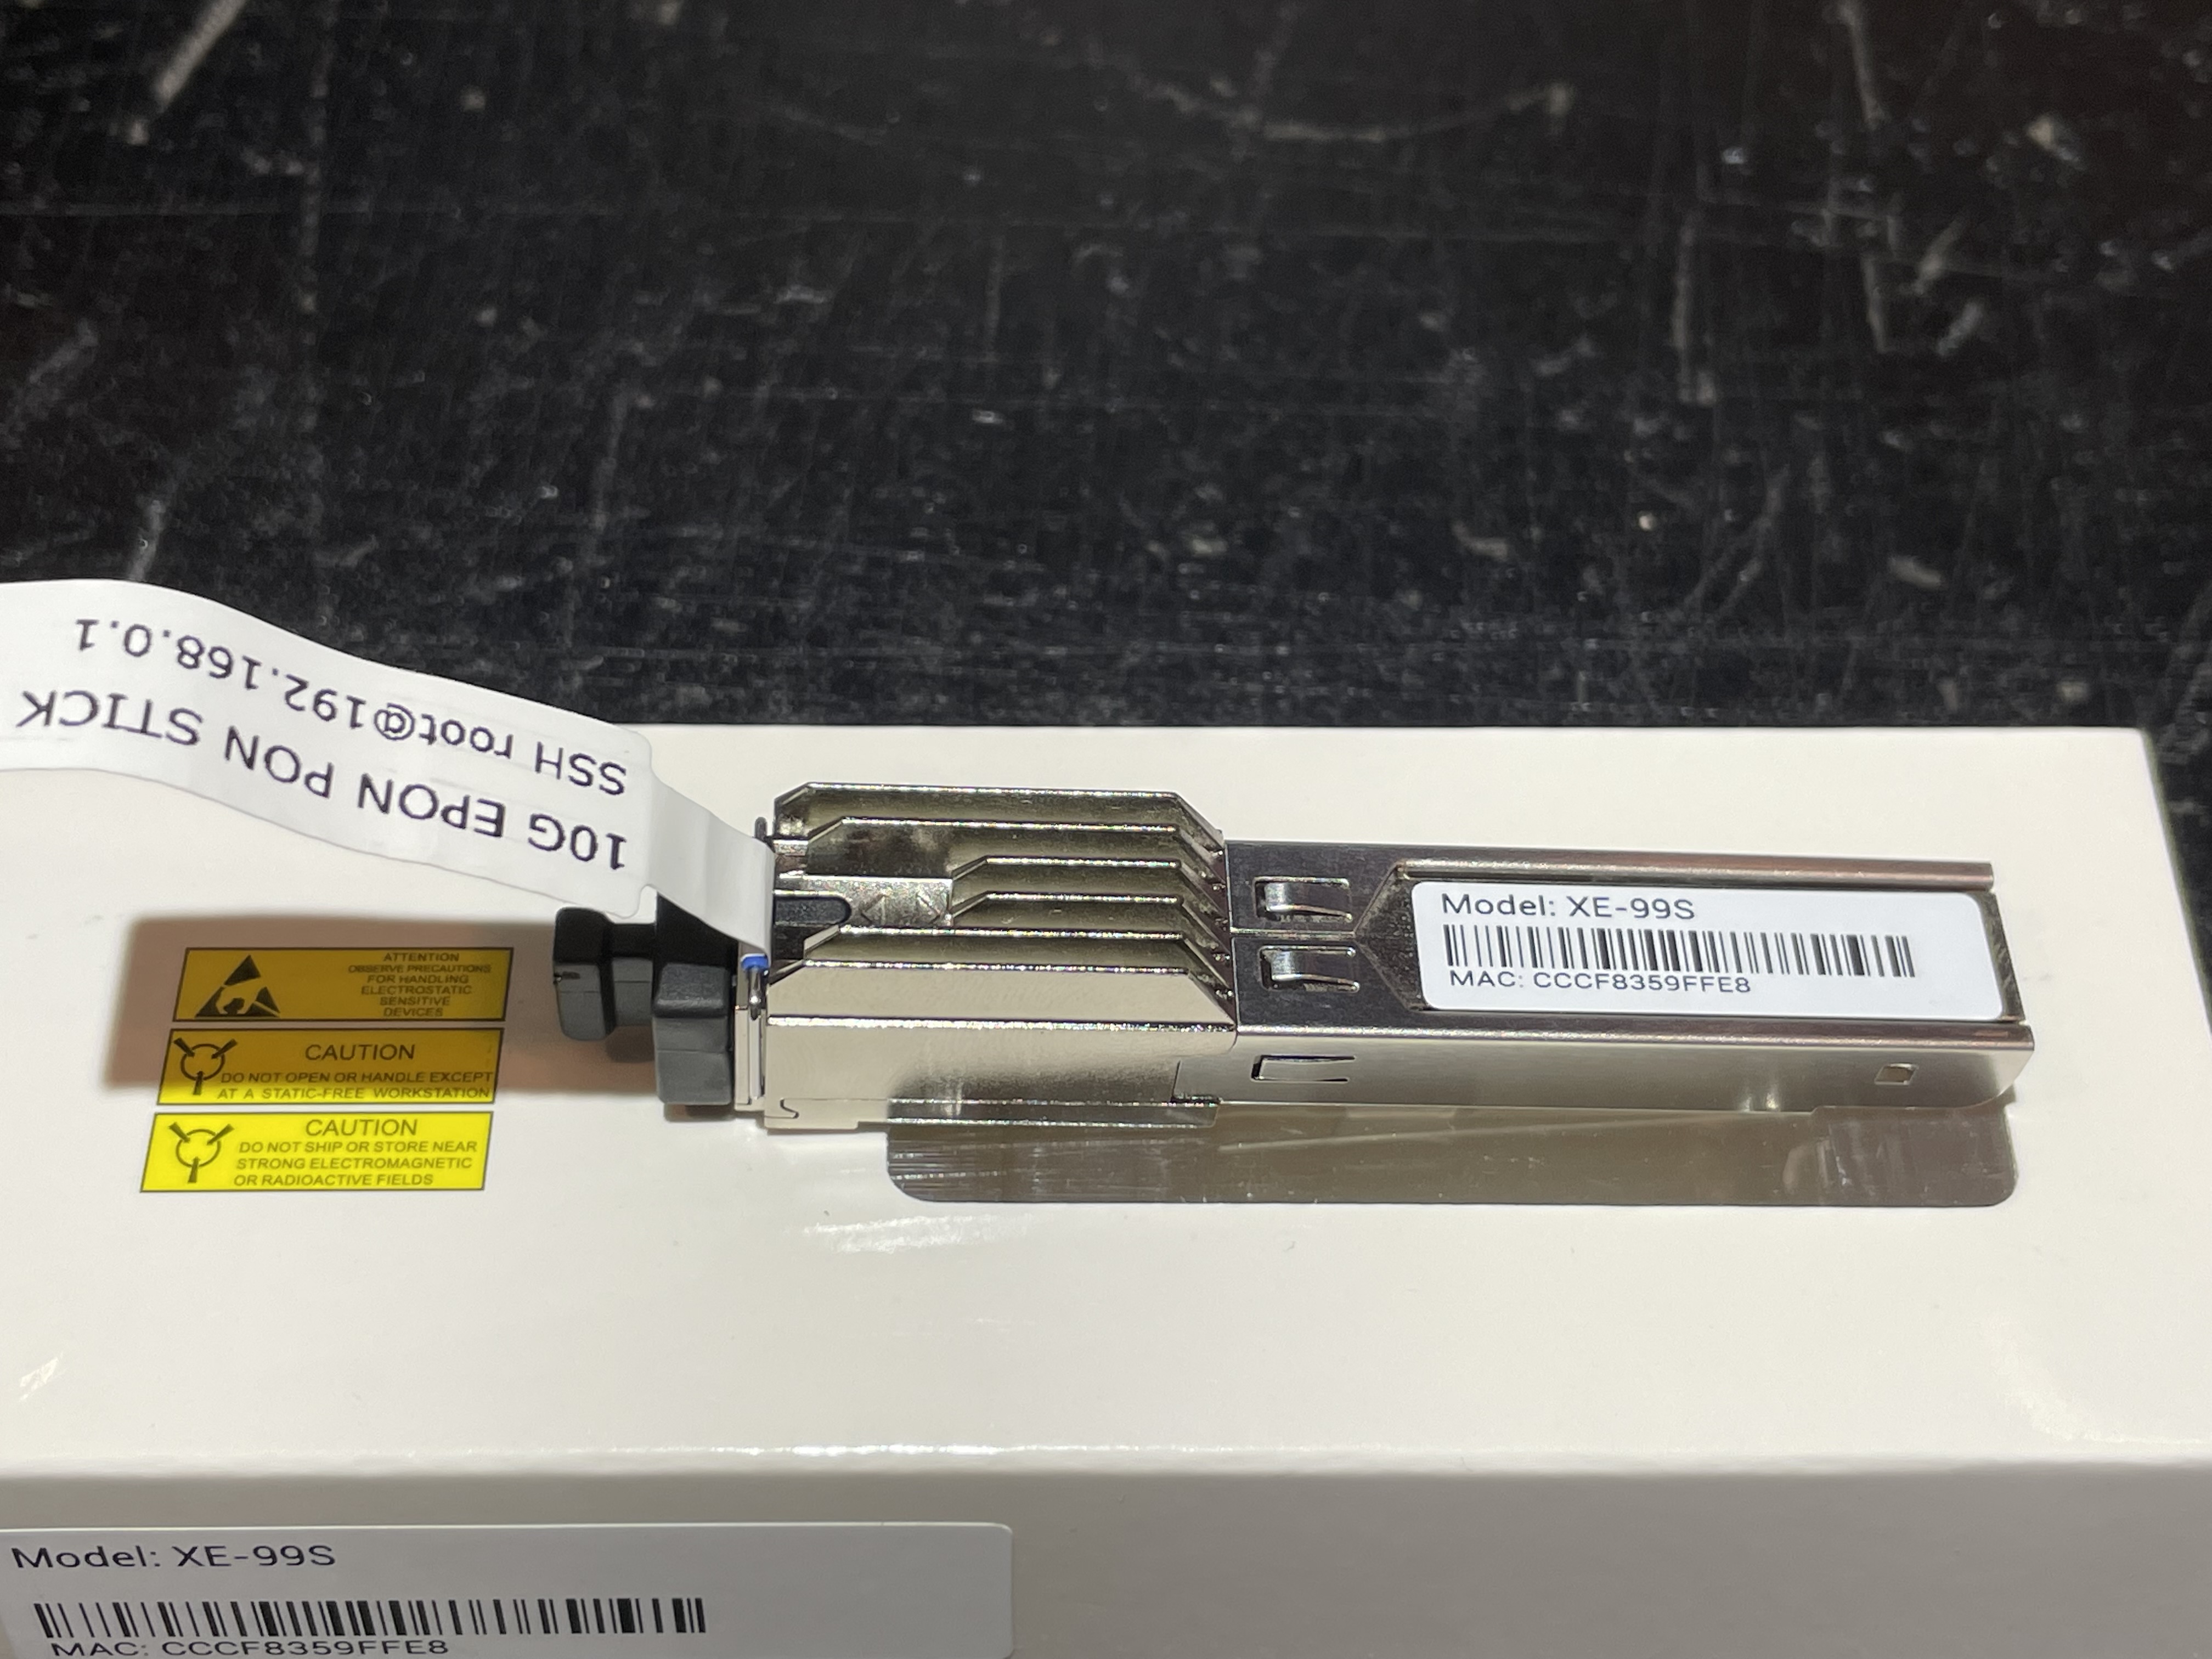
Hardware Specifications
| Vendor/Brand | CIG |
| Model | XE-99S |
| ODM | CIG |
| ODM Product Code | XE-99S |
| Chipset | Cortina CA8271S |
| Flash | MX35LF1GE4AB 128MB |
| RAM | 128MB |
| CPU | Taroko V0.2 (MIPS) |
| CPU Clock | 125MHz |
| Bootloader | SATURN uboot |
| System | Custom Linux by Cortina (Saturn SDK) based on Kernel 4.4 Saturn-sfpplus-r1 |
| 2.5GBaseX | Yes |
| XGMII/XSGMII | Yes |
| Optics | SC/UPC |
| IP address | 192.168.0.1 |
| Web Gui | ✅ user admin, password admin (Custom firmware only) |
| SSH | ✅ Oliginal firmware : user root, password is none / Custom firmware : user root, password ca8271 |
| Telnet | ✅ Oliginal firmware : user root, password is none / Custom firmware : user root, password ca8271 |
| Serial | ✅ |
| Serial baud | 115200 |
| Serial encoding | 8-N-1 |
| Form Factor | miniONT SFP |
Serial
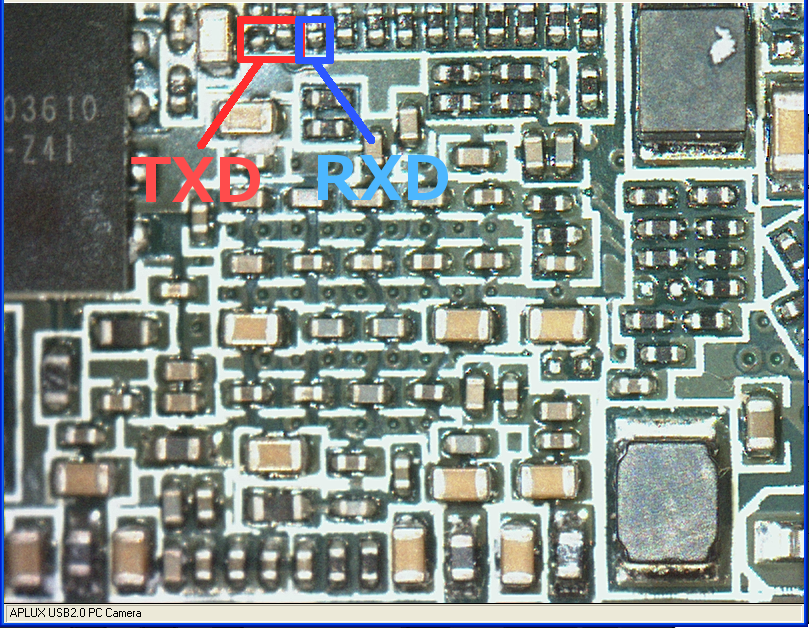
The stick has a TTL 3.3V UART console (configured as 115200 8-N-1) that can be accessed from the SFP connector, but no components are mounted.
The UART can be accessed by any of the following methods.
- Touch the needle to a specific point
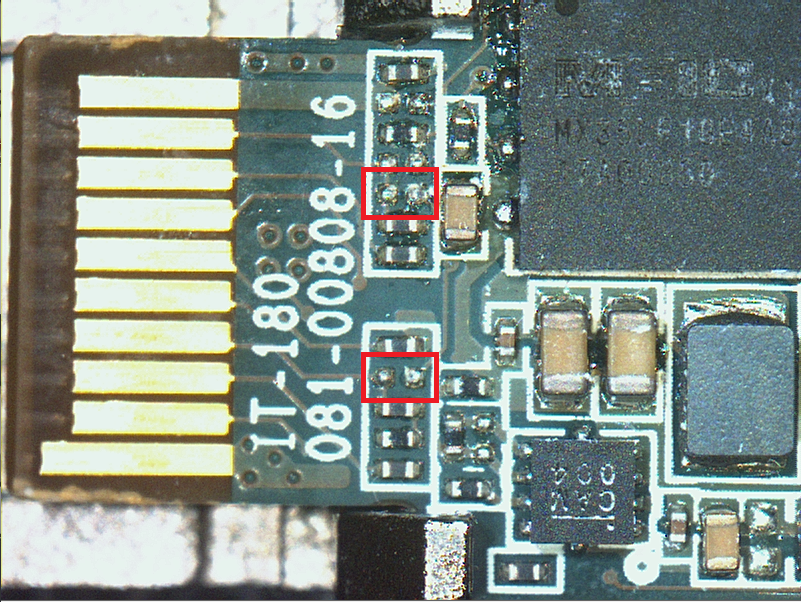
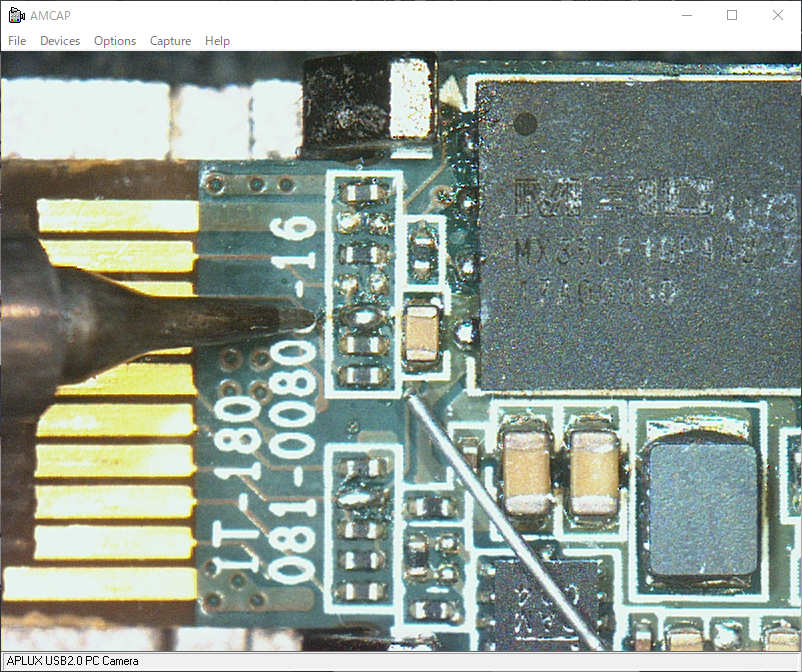
- Shorting a specific pad to access from SFP
Access from PCB
The UART can be accessed by connecting a wire or touching a needle to the following points.
Access from SFP
By shorting these two points with solder, you can access the UART from SFP pins 2 and 7.
| USB - TTL Adapter | SFP Connector (Molex, etc) |
|---|---|
| Vcc (3.3V) | pin #15 , #16 |
| TX | pin #7 |
| RX | pin #2 |
| GND | pin #10 |
Note
USB TTL adapter may not work due to insufficient power supply. If possible, obtain 3.3V from a dedicated power supply instead of the USB TTL adapter.
Custom firmware is interchangeable with
The custom firmware is compatible with the following.
- CIG XG-99S (GPON)
- ECIN EN-XGSFPP-OMAC v1 (GPON)
- FS XGS-ONU-25-20NI (GPON)
- Hisense LTF-7267-BH+ (GPON)
- Hisense LTF-7263-BH+
Firmware versions
Original firmware (SIEPON Package-C)
- CTC20220901
Custom Firmware (SIEPON Package-A)
- v1.0.0
- v1.1.0
- v1.2.0
- v1.3.0
The CIG XE-99S is supported from v1.1.0 onwards.
Custom firmware files
List of partitions
| dev | size | erasesize | name |
|---|---|---|---|
| mtd0 | 00040000 | 00020000 | "ssb" |
| mtd1 | 00100000 | 00020000 | "uboot-env" |
| mtd2 | 00100000 | 00020000 | "dtb0" |
| mtd3 | 00600000 | 00020000 | "kernel0" |
| mtd4 | 02800000 | 00020000 | "rootfs0" |
| mtd5 | 00100000 | 00020000 | "dtb1" |
| mtd6 | 00600000 | 00020000 | "kernel1" |
| mtd7 | 02800000 | 00020000 | "rootfs1" |
| mtd8 | 01400000 | 00020000 | "userdata" |
| mtd9 | 00100000 | 00020000 | "mfginfo1" |
| mtd10 | 00100000 | 00020000 | "mfginfo2" |
This ONT supports dual boot.
kernel0 and rootfs0 respectively contain the kernel and firmware of the first image, kernel1 and rootfs1 the kernel and firmware of the second one.
Usage
Configure IP Address
Set your PC’s IP address to 192.168.0.5/24
Download Custom Firmware
Download the following firmware files and place them on a TFTP server (e.g., 3CDaemon):
SIEPONA_rootfs.binSIEPONA_kernel.bin
Log in to the Stick root shell
$ ssh root@192.168.0.1

root@XE-99S:~#
Upload Firmware to the Stick
Run the following commands to download the firmware via TFTP:
cd /tmp
tftp -r SIEPONA_kernel.bin -g 192.168.0.5
tftp -r SIEPONA_rootfs.bin -g 192.168.0.5
Reset Configuration
mkdir /userdata/upper
rm -r /overlay/upper/*
Flash the Firmware
Execute the following commands to write the firmware:
flash_erase /dev/$(awk -F: '$2 ~ /"kernel1"/ {print $1}' /proc/mtd) 0 0
nandwrite -p /dev/$(awk -F: '$2 ~ /"kernel1"/ {print $1}' /proc/mtd) /tmp/SIEPONA_kernel.bin
flash_erase /dev/$(awk -F: '$2 ~ /"rootfs1"/ {print $1}' /proc/mtd) 0 0
nandwrite -p /dev/$(awk -F: '$2 ~ /"rootfs1"/ {print $1}' /proc/mtd) /tmp/SIEPONA_rootfs.bin

flash_erase /dev/$(awk -F: '$2 ~ /"kernel0"/ {print $1}' /proc/mtd) 0 0
nandwrite -p /dev/$(awk -F: '$2 ~ /"kernel0"/ {print $1}' /proc/mtd) /tmp/SIEPONA_kernel.bin
flash_erase /dev/$(awk -F: '$2 ~ /"rootfs0"/ {print $1}' /proc/mtd) 0 0
nandwrite -p /dev/$(awk -F: '$2 ~ /"rootfs0"/ {print $1}' /proc/mtd) /tmp/SIEPONA_rootfs.bin
Reboot the Stick
Reboot or power off the device:
rebootThe reboot process takes approximately 180 seconds. If an error occurs with the reboot command, simply turn off the power.
Access the Web UI
Open the following URL in your browser:
| User | Password |
|---|---|
admin | admin |
Set PON MAC Address
From the menu, select "PON MAC Address" and configure the EPON MAC address of your ONT.
Configure Forced Bridge Mode
From the menu, select "Forced Bridge mode" and enable it.
Reboot the Stick
Select "Reboot" from the menu. The reboot process takes approximately 180 seconds.
Connect the Fiber
Connect the ISP fiber cable to the stick.
ONT Authentication
Once authentication is successful, the "PON" and "AUTH" status indicators under the "Status" menu will show "OK". At this point, the stick is successfully connected to the ISP network.
EPON ONT status
Getting the operational status of the ONT
Check the ONT Registration State with the following command:
ca-iros-> wca_epon_mpcp_registration_status_get -device_id 0 -port_id 0x20007 -llid 0
[deregistration_cause = 0]
[mpcp_llid = 65535]
[olt_mac_addr = 00:00:00:00:00:00]
[reg_state = 0]
[retry_times = 0]
Return Value : 0 - CA_E_OK
0
Check the ONT auth state with the following command:
ca-iros-> wca_epon_llid_traffic_enable_get -device_id 0 -port_id 0x20007 -llid 0x0
[downstream = 1]
[upstream = 1]
0
EPON/OAM TLV settings
The XE-99S Custom firmware uses a web UI for configuration.
| User | Password |
|---|---|
admin | admin |
Getting/Setting ONT EPON MAC Address
Menu > PON Setup > PON MAC AddressGetting/Setting OAM firmware version (TLV D7/03)
Menu > TLV Setup > Firmware Info (D7/03)Getting/Setting OAM chipset info (TLV D7/04)
Menu > TLV Setup > Chipset Info (D7/04)Getting/Setting OAM manufacture date (TLV D7/05)
Menu > TLV Setup > Date of Manufacture (D7/05)Getting/Setting OAM manufacture info (TLV D7/06)
Menu > TLV Setup > Date of Manufacture Info (D7/06)Getting/Setting OAM vendor Name (TLV D7/11)
Menu > TLV Setup > Vendor Name (D7/11)Getting/Setting OAM model Name (TLV D7/12)
Menu > TLV Setup > Model Number (D7/12)Getting/Setting OAM hardware version (TLV D7/13)
Menu > TLV Setup > Hardware Version (D7/13)Useful files and binaries
Disguise as Cisco SFP+ module
To disguise an SFP as a genuine Cisco SFP module, execute the following command :
root@saturn-sfpplus-eng:~# BOSA_Write /script/BOSA/cisco.txtThe ONT will automatically restart once the process is complete.