
Hardware Specifications
| Vendor/Brand | FS |
| Model | XGS-ONU-25-20NI |
| ODM | CIG |
| ODM Product Code | XG-99S |
| Chipset | Cortina CA8271A |
| Flash | MX35LF1GE4AB 128MB |
| RAM | 128MB |
| CPU | Taroko V0.2 (MIPS) |
| CPU Clock | 500MHz |
| Bootloader | SATURN uboot |
| System | Custom Linux by Cortina (Saturn SDK) based on Kernel 4.4 Saturn-sfpplus-r1 |
| 2.5GBaseX | Yes |
| XGMII/XSGMII | Yes |
| Optics | SC/APC |
| IP address | 192.168.100.1 |
| Web Gui | |
| SSH | No |
| Telnet | ✅ |
| Serial | ✅ |
| Serial baud | 115200 |
| Serial encoding | 8-N-1 |
| Form Factor | miniONT SFP |
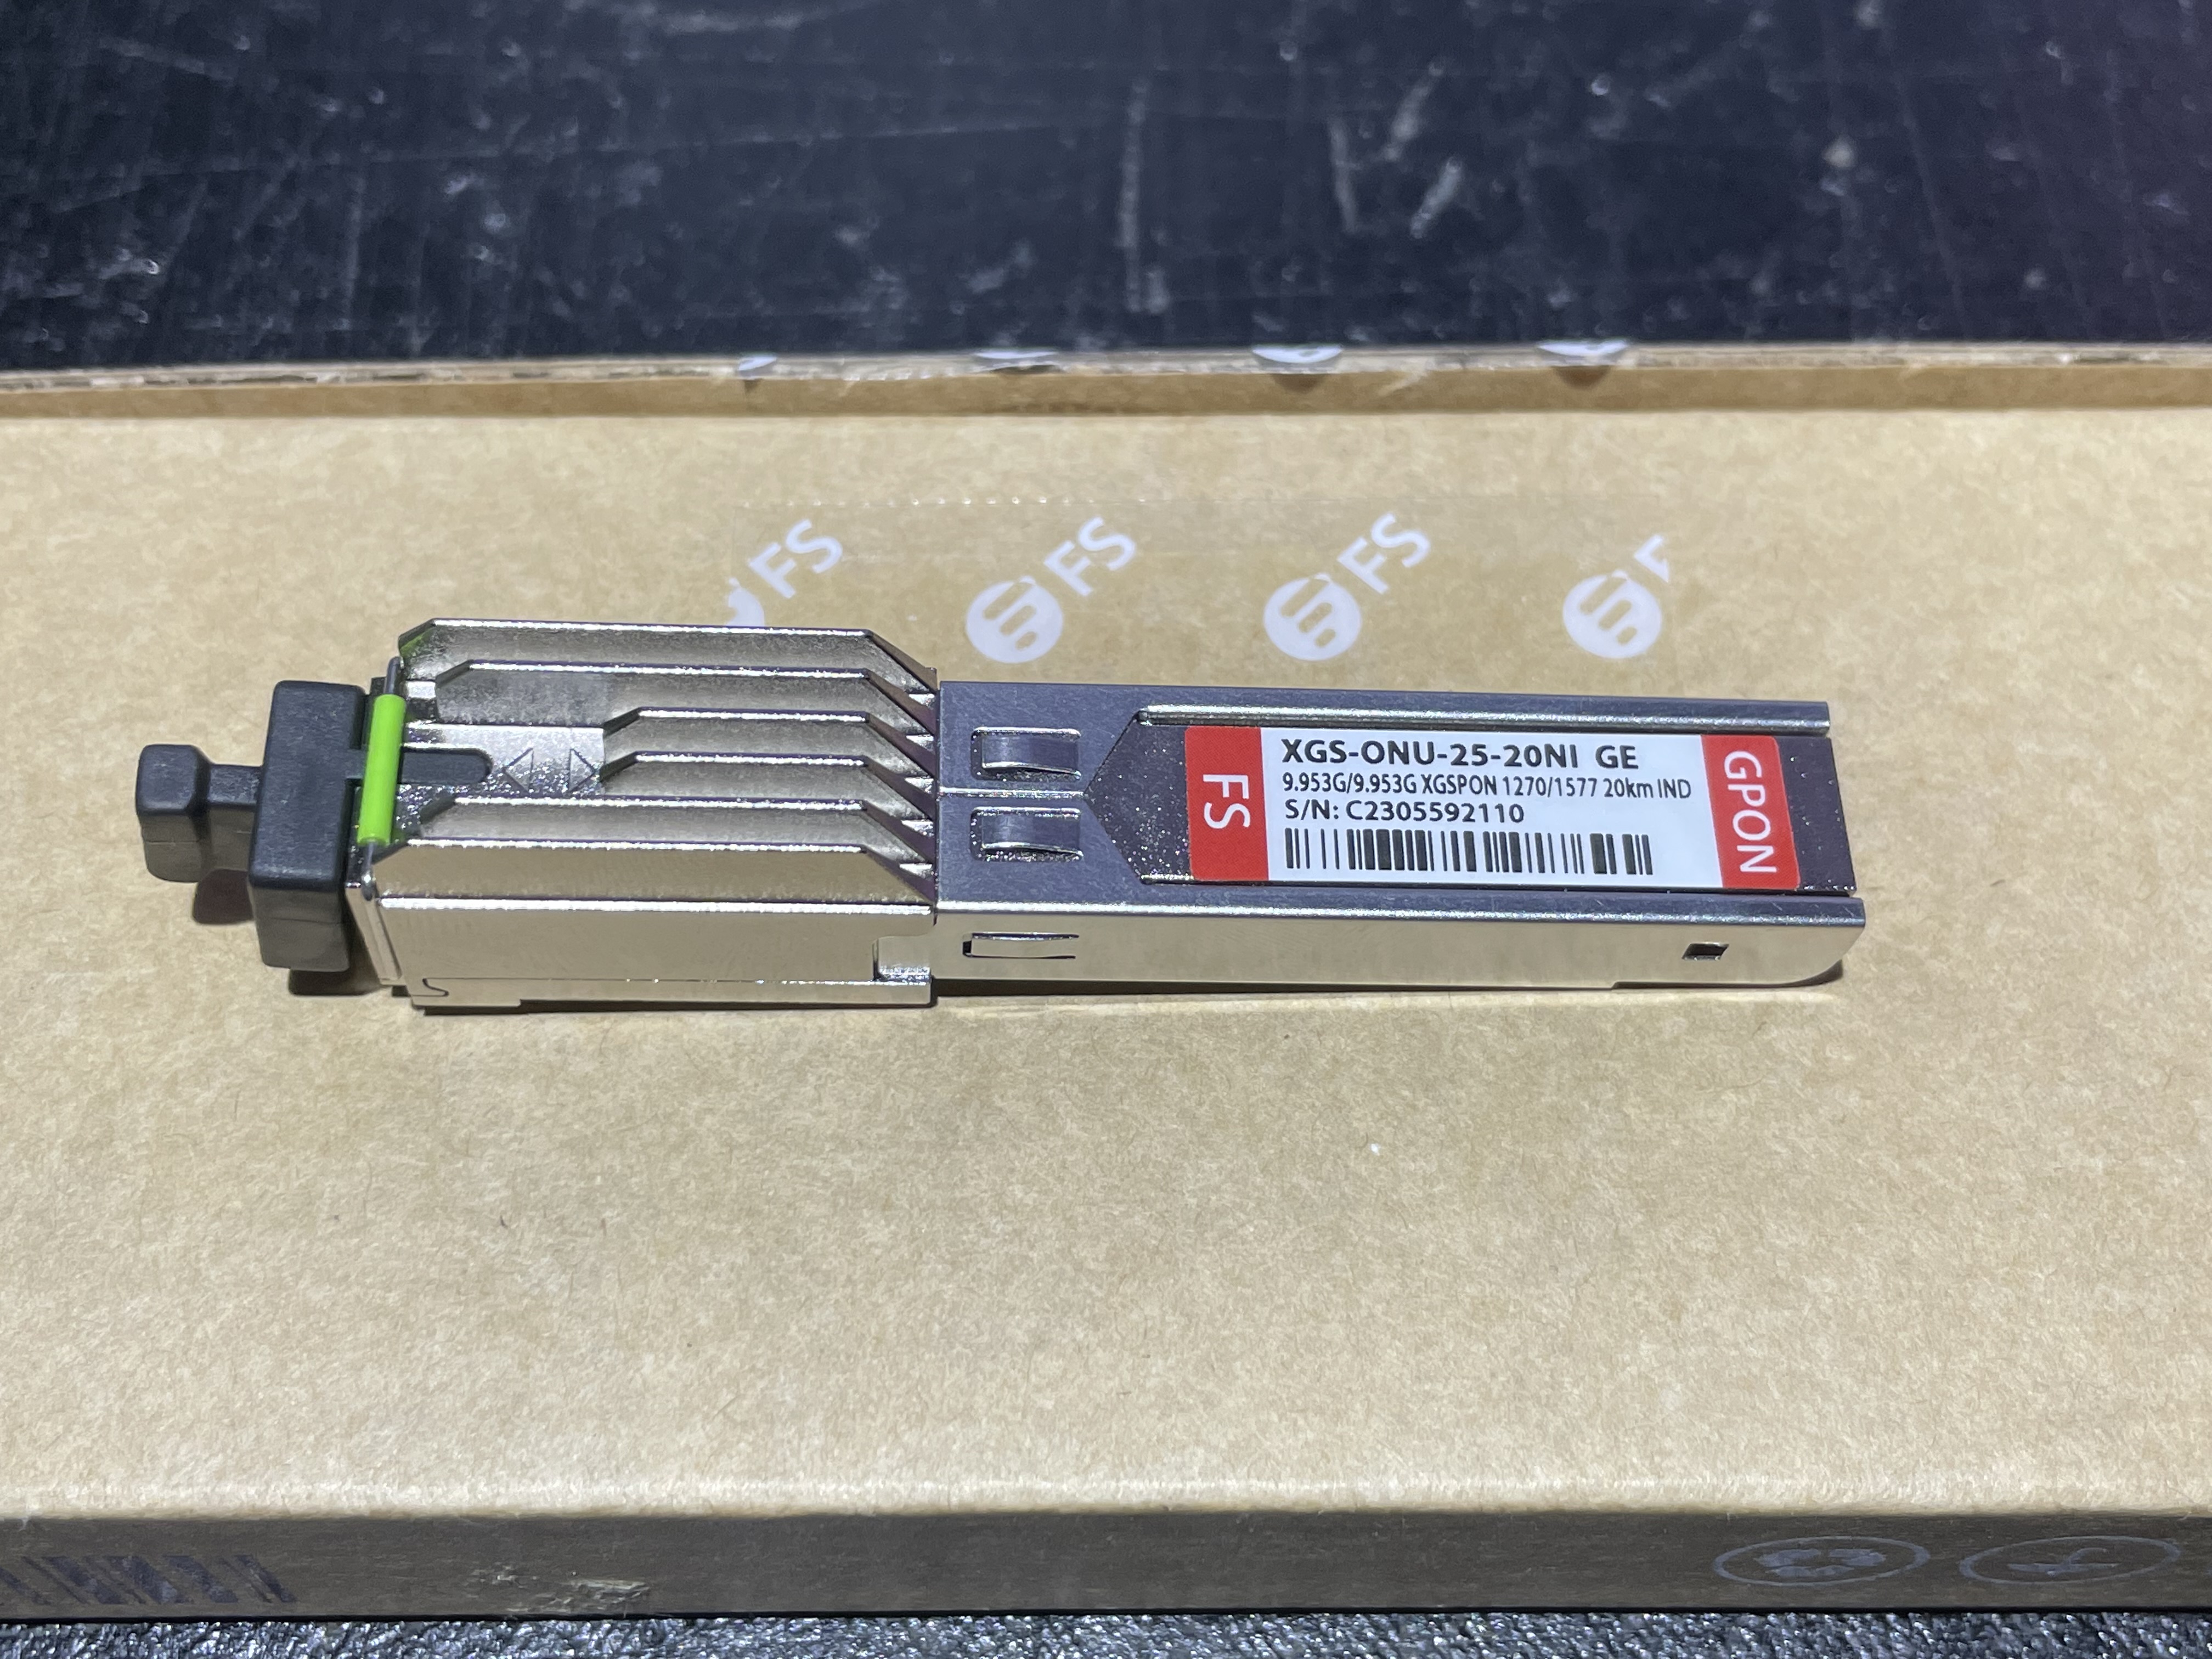
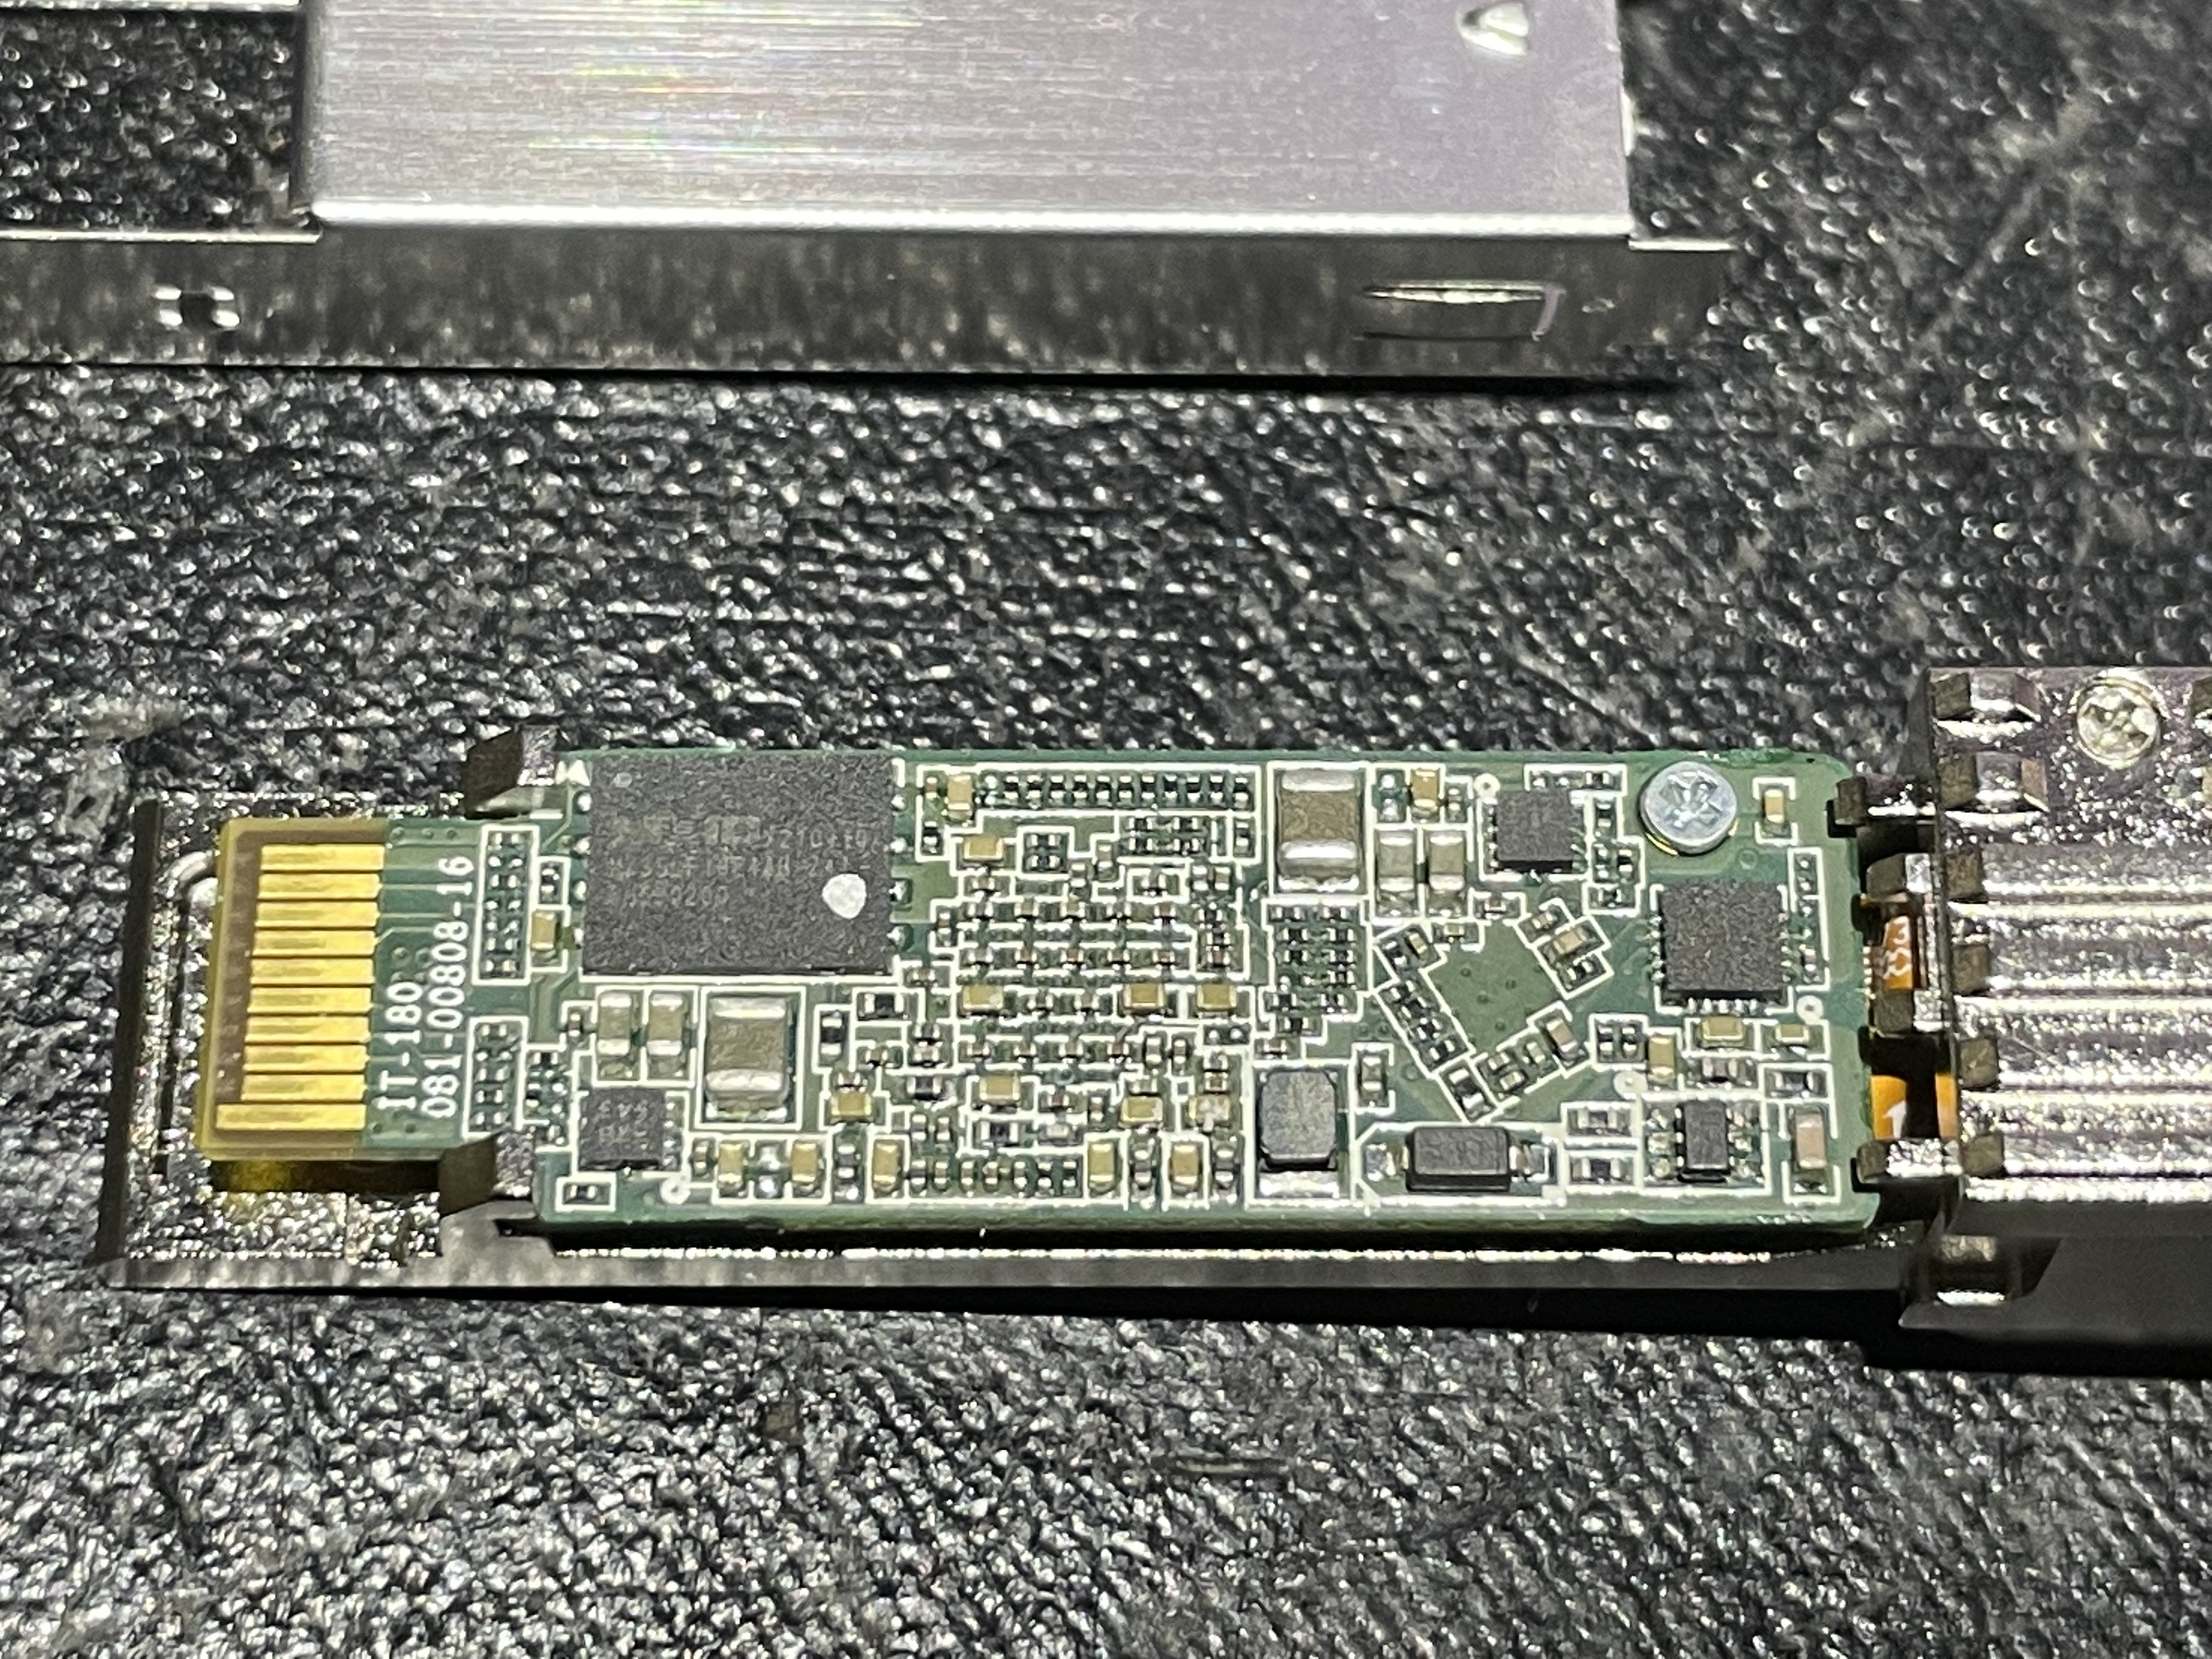
Serial
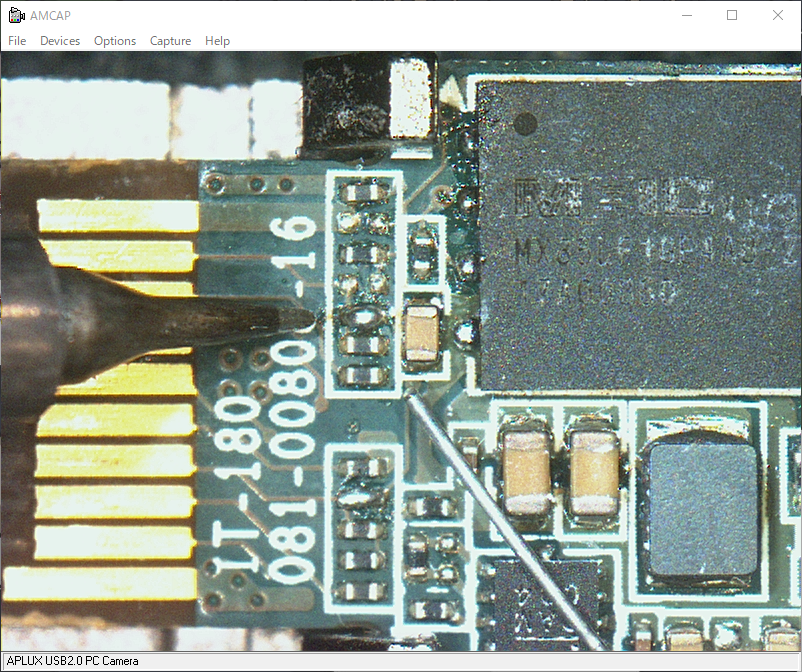
The stick has a TTL 3.3V UART console (configured as 115200 8-N-1) that can be accessed from the SFP connector, but no components are mounted.
The UART can be accessed by any of the following methods.
- Touch the needle to a specific point
- Shorting a specific pad to access from SFP
Access from PCB
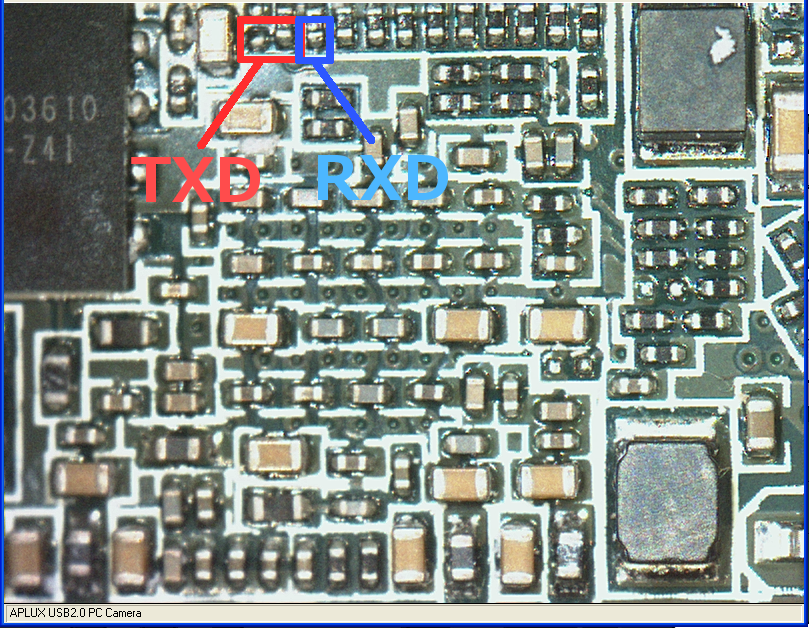
The UART can be accessed by connecting a wire or touching a needle to the following points.
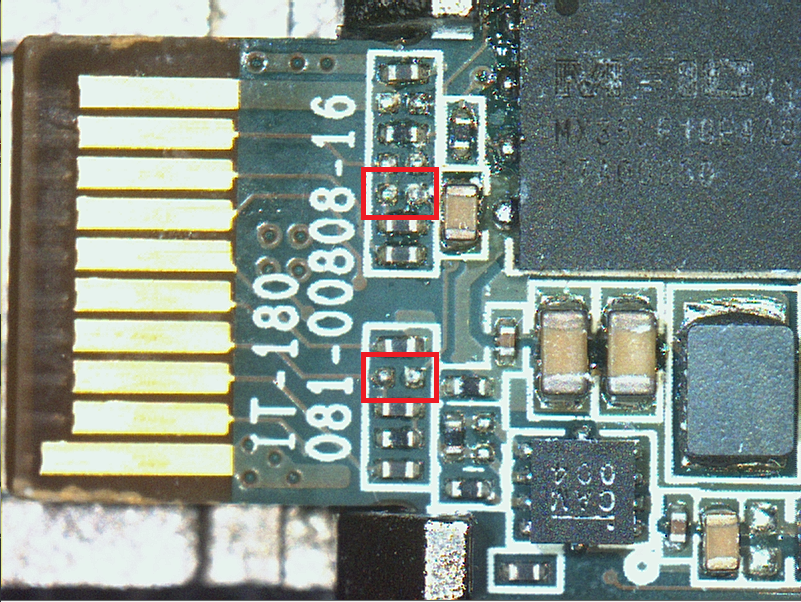
Access from SFP
By shorting these two points with solder, you can access the UART from SFP pins 2 and 7.
| USB - TTL Adapter | SFP Connector (Molex, etc) |
|---|---|
| Vcc (3.3V) | pin #15 , #16 |
| TX | pin #7 |
| RX | pin #2 |
| GND | pin #10 |
Note
USB TTL adapter may not work due to insufficient power supply. If possible, obtain 3.3V from a dedicated power supply instead of the USB TTL adapter.
Firmware is interchangeable with
The firmware is compatible with the following.
- CIG XG-99S
- CIG XE-99S (10G-EPON mode)
- ECIN EN-XGSFPP-OMAC v1
List of software versions
Available from #ONT/system>ontver build and #ONT/system/shell>cat /etc/version.
- R4.4.20.016 (from FS.com docs)
- R4.4.20.018 - 20230426061821
- R4.4.20.022 - 20230612033149
List of partitions
| dev | size | erasesize | name |
|---|---|---|---|
| mtd0 | 00040000 | 00020000 | "ssb" |
| mtd1 | 00002000 | 00020000 | "uboot-env" |
| mtd2 | 00002000 | 00020000 | "dtb0" |
| mtd3 | 0003c000 | 00020000 | "kernel0" |
| mtd4 | 00300000 | 00020000 | "rootfs0" |
| mtd5 | 004c0000 | 00020000 | "dtb1" |
| mtd6 | 00300000 | 00020000 | "kernel1" |
| mtd7 | 004c0000 | 00020000 | "rootfs1" |
| mtd8 | 00001000 | 00020000 | "userdata" |
| mtd9 | 00001000 | 00020000 | "mfginfo1" |
| mtd10 | 00001000 | 00020000 | "mfginfo2" |
| mtd11 | 00001000 | 00020000 | "uboot-env2" |
This ONT supports dual boot.
kernel0 and rootfs0 respectively contain the kernel and firmware of the first image, kernel1 and rootfs1 the kernel and firmware of the second one.
Useful files and binaries
scfg.txt
In the XGS-ONU-25-20NI ONT, the settings are loaded by four scfg.txt files. For overwriting settings, /userdata/scfg.txt and /tmp/scfg.txt are used.
/config/default_scfg.txt(read only): Contains the manufacturer's default settings, which are read first at ONT startup and are the lowest priority settings./config/scfg.txt(read only): Contains settings set by the firmware creator, which have higher priority thandefault_scfg.txtand will overwrite the settings if there is a conflict./userdata/scfg.txt(read/write): Contains settings set by the user or ISP. It has a higher priority than/config/scfg.txtand will overwrite the settings if there is a conflict. Can be edited and saved./tmp/scfg.txt(temp): It contains dynamically generated settings based on values stored on its custom ROM (mtd9, mtd10). Because they are generated on tmpfs and cannot be saved directly, they are rewritten via the#ONT> system/misccommand on the ONT.
The settings are overwritten and loaded at startup with the following priority:
(High) /tmp/scfg.txt > /userdata/scfg.txt > /config/scfg.txt > /config/default_scfg.txt (Low)
Misc Command
To configure settings using the MISC command, execute the following command:
#ONT> system/misc
#ONT/system/misc>
Usage
Login and Enable
This stick does not have a web UI. To configure it, you must log in via UART or telnet.
Note
FS.com Stick XGS-ONU-25-20NI does not have its PON S/N on the label: the S/N field stamped on the label is FS.com's internal S/N, not the PON S/N. In order to obtain the actual PON S/N, either ask an FS.com sales representative or check the boot log from the UART!
| User | Password (Enable Password) |
|---|---|
| ONU GPON Serial Number | 8 digit HMAC-MD5 based on Uppercase ONU GPON Serial Number |
Use the following form to generate login credentials:
Or follow this external documentation on how to emulate the ONT in QEMU, use at your own risk.
UART does not ask for a login, it is possible to get a root shell without knowing the password.
Root procedure
After logging in via telnet or UART, you will first access the MiniShell with user privileges:
ONT>The root MiniShell can be accessed by executing the enable command on this MiniShell:
ONT> enable
#ONT>
Switching to the Linux root shell is possible by executing the following command:
#ONT> system/shell
#ONT/system/Shell> sh
#
GPON ONU status
Getting the operational status of the ONU
Check the ONU Registration State with the following command:
#ONT> traffic/pon/show onu

------------------------- ONU INFO --------------------------

Onu id 65535
sdThreshold:   0
sfThreshold:   0
TO1:   80000
TO2:   1
eqd:   0
Serial Number(vendor code): GPON
Serial Number(sn):          abcd1234
Password:                   30 31 32 33 34 353 36 37 38 39
Registration ID:           0x44454641554c540000000000000000000000000000000000000000000000000000000000
------------------------- INFO END --------------------------

#ONT>
Check the ONU operation state with the following command:
#ONT>traffic/pon/show link

 ----------------- LINK STATE -----------------
 Operation State Machine: INIT (O1)
 ----------------- STATE  END -----------------

#ONT>
Getting OLT vendor information
OLT information can be extracted from MIB 131 with the following command:
#ONT>system/mib/show 131
Table Oltg, Olt-g, total 1 instances

EntityID                  = 0x0000
VendorId                  = ""
EquipmentId               = ""
Version                   = 00 00 00 00 00 00 00 00 00 00 00 00 00 00
TimeOfDay                 = 00 00 00 00 00 00 00 00 00 00 00 00 00 00

#ONT>
Querying a particular OMCI ME
You can browse the MIB with the following command:
#ONT> system/mib
#ONT/system/mib>
Showing a list of supported MIBs
#ONT/system/mib> show
This command prints out the content of a MIB table.
Usage: show CLASSID
CLASSID:
      the class ID of the ME, defined in 983.2/984.4, currently
the following MEs are supported:
ClassID  Name            Desc
256      Ontg            Ont-g
etc...
Showing a specific MIB
For example, to display MIB 256 (Ont-g):
#ONT/system/mib>show 256
Table Ontg, Ont-g, total 1 instances

EntityID                  = 0x0000
VID                       = "GPON"
Version                   = 58 47 2d 39 39 53 00 00 00 00 00 00 00 00
SerialNum                 = 47 50 4f 4e ab cd 12 34
TraffMgtOpt               = 2
AtmCCOpt                  = 0
BatteryBack               = 1
AdminState                = 0
OpState                   = 0
OnuSurvivalTime           = 0
Loid                      = ""
Password                  = ""
AuthState                 = 0
OntState                  = 1

#ONT/system/mib>
Dumping a MIB
Output a dump of MIB to /tmp/mibdump.txt
#ONT/system/mib> dump
MIB is saved to the file /tmp/mibdump.txt.
#ONT/system/mib>
Getting Speed LAN Mode
LAN Speed Mode can be verified from the Status column displayed by the following command:
#ONT>traffic/eth/show pack

build time Apr 26 2023: 06:23:15

-------------------- Line Pack -- PWR 0X0      --
Line Slot 10, NumOfPorts 1, type 49, subtype 75, state 2
-------------------- Configuration -------------------
port | enable | loop | Mode | RL Type | RL Us Rate| RL Ds Rate|
1       Yes     No      Auto            0       0       0

-------------------- Status -------------------
1) link state: Up, link mode: 2.5G Full

-------------------- Bridge Pack -------------------
Type:       75
State:      2
MAC Table:  0
MAC Aging:  0
MTU:        0
-------------------- Chip Data -------------------
eth Fd:         7
port Mask:      0x0018
type            28

********** DEBUG INFO **********
                 EmrLogId  : 5
               EmrAdminEn  : 0
              EmrbeInited  : 1
              EmrDumpConn  : 0
             EmrPwrShedEn  : 0x0
           EmrConnItemNum  : 0
         EmrUsDsReverseEn  : 1
       EmrConnAllVidCheck  : 0
      EmrMcastGemVlanOpEn  : 1
       gEmrSaveConnItemEn  : 1
      gEmrMcastCrossVlanEn : 1
    EmrUniExtractPriMatch  : 1
 EMR_DRV_PACK_DUMP_ITEM_EN : 0
********************************
#ONT>
GPON/OMCI settings
XGS-ONU-25-20NI ONT uses the scfg.txt file and misc command for configuration.
Getting/Setting ONU GPON Serial Number
This setting must be changed with the misc CLI option and the eqsn set "<serialnumber>" command. For example, if the desired S/N is GPONabcd1234 (47504f4eabcd1234):
#ONT/system/misc> eqsn set "GPONabcd1234"The get command can also be used to retrieve the configured PON S/N.
#ONT/system/misc> eqsn get
eqsn: GPONabcd1234
Getting/Setting ONU GPON PLOAM password
This setting must be changed with the misc CLI option and the exeep_w8 "<password>" command. For example, if the desired PLOAM password is 0123456789:
#ONT/system/misc> exeep_w8 "0123456789"The exeep_r8 command can also be used to retrieve the configured PLOAM password.
#ONT/system/misc> exeep_r8
[00, 000] 44 45 46 41 55 4c 54 00 - 00 00 00 00 00 00 00 00     |  DEFAULT......
[10, 016] 00 00 00 00 00 00 00 00 - 00 00 00 00 00 00 00 00     |  .............
[20, 032] 00 00 00 00 ff ff ff ff - ff ff ff ff ff ff ff ff     |  .............
[30, 048] ff ff ff ff ff ff ff ff - ff ff ff ff ff ff ff ff     |  .............
[40, 064] ff ff ff ff ff ff ff ff - ff ff ff ff ff ff ff ff     |  .............
[50, 080] ff ff ff ff ff ff ff ff - ff ff ff ff ff ff ff ff     |  .............
[60, 096] ff ff ff ff ff ff ff ff - ff ff ff ff ff ff ff ff     |  .............
[70, 112] ff ff ff ff ff ff ff ff - ff ff ff ff ff ff ff ff     |  .............
[80, 128] ff ff ff ff ff ff ff ff - ff ff ff ff ff ff ff ff     |  .............
[90, 144] ff ff ff ff ff ff ff ff - ff ff ff ff ff ff ff ff     |  .............
[a0, 160] ff ff ff ff ff ff ff ff - ff ff ff ff ff ff ff ff     |  .............
[b0, 176] ff ff ff ff ff ff ff ff - ff ff ff ff ff ff ff ff     |  .............
[c0, 192] ff ff ff ff ff ff ff ff - ff ff ff ff ff ff ff ff     |  .............
[d0, 208] ff ff ff ff ff ff ff ff - ff ff ff ff ff ff ff ff     |  .............
[e0, 224] ff ff ff ff ff ff ff ff - ff ff ff ff ff ff ff ff     |  .............
[f0, 240] ff ff ff ff ff ff ff ff - ff ff ff ff 15 91 f3 9f     |  ............k
Getting/Setting ONU GPON LOID
This setting must be changed in scfg.txt, using the key CHAR-ARRAY CFG_ID_LOID. To modify the LOID username, add the following line to /userdata/scfg.txt:
CHAR-ARRAY CFG_ID_LOID = { 0xXX,0xXX,0xXX,0xXX, 0xXX,0xXX,0xXX,0xXX, 0xXX,0xXX,0xXX,0xXX, 0xXX,0xXX,0xXX,0xXX, 0xXX,0xXX,0xXX,0xXX, 0xXX,0xXX,0xXX,0xXX };For example, if the desired LOID is 0123456:
CHAR-ARRAY CFG_ID_LOID = { 0x30,0x31,0x32,0x33, 0x34,0x35,0x36,0x00, 0x00,0x00,0x00,0x00, 0x00,0x00,0x00,0x00, 0x00,0x00,0x00,0x00, 0x00,0x00,0x00,0x00 };Getting/Setting ONU GPON LOID password
This setting must be changed with the misc CLI option and the pon_passwd set <password> command. For example, if the desired LOID password is 0123456789:
#ONT/system/misc> pon_passwd set 0123456789The get option can also be used to retrieve the configured LOID password:
#ONT/system/misc> pon_passwd get
eqsn: 01234567890000000000
Getting/Setting OMCI hardware version (ME 256)
This setting must be changed with the misc CLI option and the eqvid set "<hwver>" command. For example, if the desired hardware version is abc123:
#ONT/system/misc> eqvid set "abc123"The get option can also be used to retrieve the configured hardware version.
#ONT/system/misc> eqvid get
eqvid: abc123
Getting/Setting OMCI vendor ID (ME 256)
This setting must be changed with the misc CLI option and the vendor set "<vendor>" command. For example, if the desired vendor is GPON:
#ONT/system/misc> vendor set "GPON"The get option can also be used to retrieve the configured PON S/N vendor field:
#ONT/system/misc> vendor get
vendor: GPON
In this ONT, the MIB OntG Vendor can be set to a value different from the S/N vendor value:
#ONT/system/misc> eqsn get
eqsn: GPONabcd1234
#ONT/system/misc> vendor get
vendor: ZTEG
Advanced settings
See the link below for other MiniShell commands.
Transferring files to the stick
Stick's busybox (Linux shell) supports netcat and TFTP, which allow to send and receive files:
# tar cf - localfile | nc remotehost-ip 10000# tftp -r remotefile.bin -g remotehost-ipBacking up all partitions
To obtain a backup, use the dd command to save it on /tmp:
# dd if=/dev/mtdX of=/tmp/mtdX.bin
# tftp -l /tmp/mtdX.bin -r remotehost-ip
Or use the cat command to transfer it via netcat:
# cat /dev/mtdX | nc remotehost-ip 10000When partition writing to the stick, use the flash command set. (Do not write with the dd command because ECC is enabled).
# flash_eraseall /dev/mtdX
# flashcp -v targetfile /dev/mtdX
Setting management IP
To change the management IP, set it with the misc CLI option and the admin_ip set <ip> command. For example, if the desired management IP is 192.168.1.1:
#ONT/system/misc> admin_ip set 192.168.1.1To change the management IP netmask, set it with the misc CLI option and the admin_mask set <netmask> command. For example, if the desired management IP mask is 255.255.255.0:
#ONT/system/misc> admin_mask set 255.255.255.0Random notes
Bricked stick Repair
Note
This is an external file (mtd dump), so use it at your own risk!
If the stick is bricked, it can be repaired by accessing uboot from the UART.
If stick fails to boot, uboot will enable text input.
ERROR: can't get kernel image!
SATURN#
Download the stick's mtd dump from GitHub.
Enable NAND with the following command:
SATURN# spi_nand probe 0
SPI_NAND ID: 0x12c200
SPI-NAND: MX35LF1GE4AB is found.
MX35LF1GE4AB
spinand_oob_size:0x40
spinand_page_size:0x800
spinand_blk_size:0x20000
spinand_size:0x8000000
SATURN#
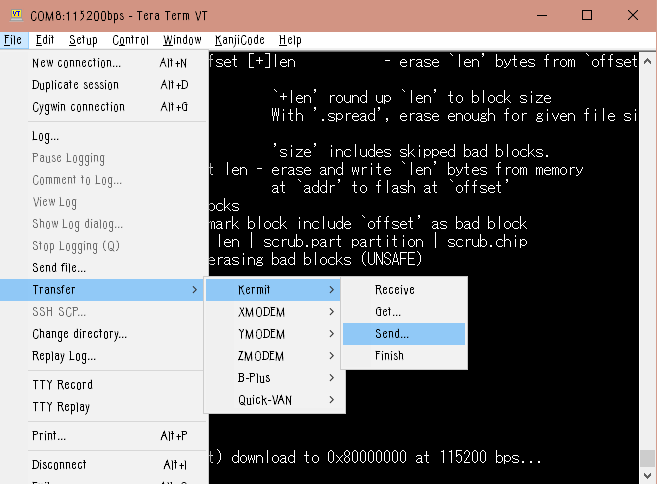
Receive the file with the loadb command.
SATURN# loadb 0x80000000
## Ready for binary (kermit) download to 0x80000000 at 115200 bps...
Using Tera Term, send the Kernel image (mtd3 or mtd6) by kermit transfer.
Erase the NAND and write the transferred kernel.
SATURN# spi_nand erase 0x000000600000 0x600000
SATURN# spi_nand erase 0x000003500000 0x600000
SATURN# spi_nand write 0x80000000 0x000000600000 0x600000
SATURN# spi_nand write 0x80000000 0x000003500000 0x600000
Receive the file with the loadb command. Using Tera Term, send the rootfs image (mtd4 or mtd7) by kermit transfer.
SATURN# loadb 0x81000000
## Ready for binary (kermit) download to 0x81000000 at 115200 bps...
Erase the NAND and write the transferred rootfs.
SATURN# spi_nand erase 0x000000c00000 0x2800000
SATURN# spi_nand erase 0x000003b00000 0x2800000
SATURN# spi_nand write 0x81000000 0x000000c00000 0x2800000
SATURN# spi_nand write 0x81000000 0x000003b00000 0x2800000
When the stick turns back on, it will boot with the transferred kernel and rootfs.
Known Bugs
- There is a bug in the
register_idcommand in themiscCLI option that changes the value ofpon_passwd(LOID Password) instead ofregister_id(PLOAM).